Smart collections based on taxonomy attributes:
You can now use taxonomy-based product features, including material, color, and other defined properties, to create smart collections with Shopify. This guarantees a more organized and scalable method of product classification by enabling you to dynamically arrange products according to Shopify’s Product Taxonomy.
1. What Are Shopify’s Taxonomy Attributes?
A uniform classification system called Shopify’s Product Taxonomy helps retailers maintain an organized product organization. It has qualities such as:
Material (such as polyester, leather, or cotton)
Color (such as green, blue, or red)
Style (such as sports, formal, or casual)
Age Group (for example, baby, child, or adult)
Pattern (such as floral, solid, or striped)
According to Shopify’s taxonomy, every product category has unique characteristics.
🔹 For instance:
Bags → Features: Material, Pattern, Closure Type
T-Shirts → Features: Material, Fit, Sleeve Length
Shoes → Features: Material, Color, Shoe Size
Without manually labeling products, you may use these qualities to create automated smart collections.
2. Using Taxonomy Attributes to Create an Intelligent Collection.
Step 1: Choose the proper Product Type
- In Shopify Admin, select Products.
- Navigate to Product Organization after opening a product.
- Choose the most pertinent Shopify Taxonomy category under Category.
🔹 For instance, choose Accessories > Wallets if the wallet is leather. - Save the product.
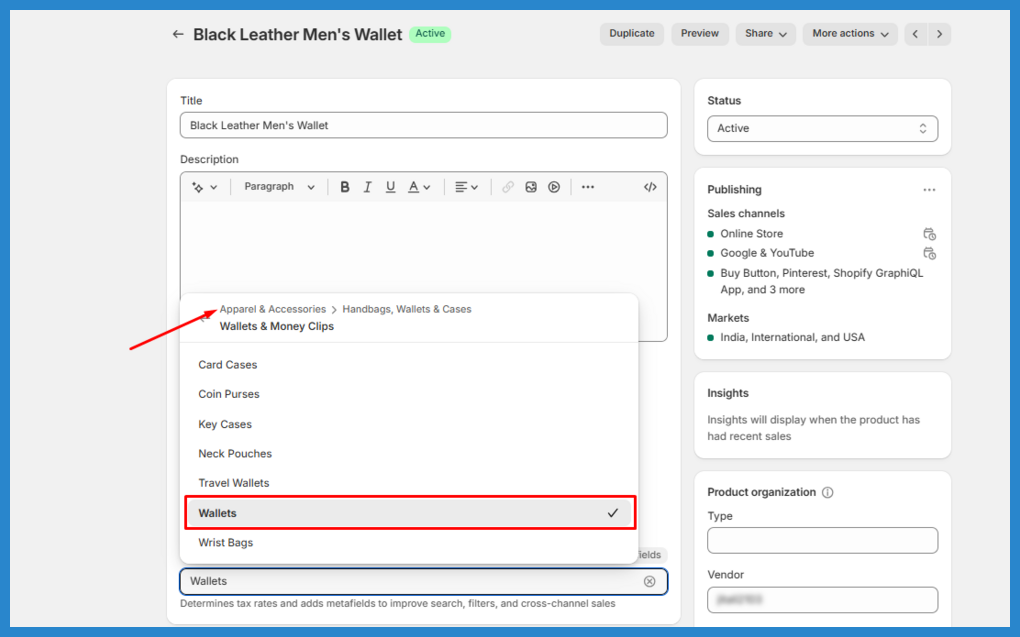
Add the material on the Category metafields on the product page

Step 2: Create a Smart Collection.
- In Shopify Admin, select Products > Collections.
- Select Smart after clicking Create Collection.
- Establish the criteria for collection:
-
- Choose a Product Taxonomy attribute as the type of condition.
- Select a property such as Material.
- Configure the condition to correspond with a certain value (material = leather, for example).
4. Save the collection.
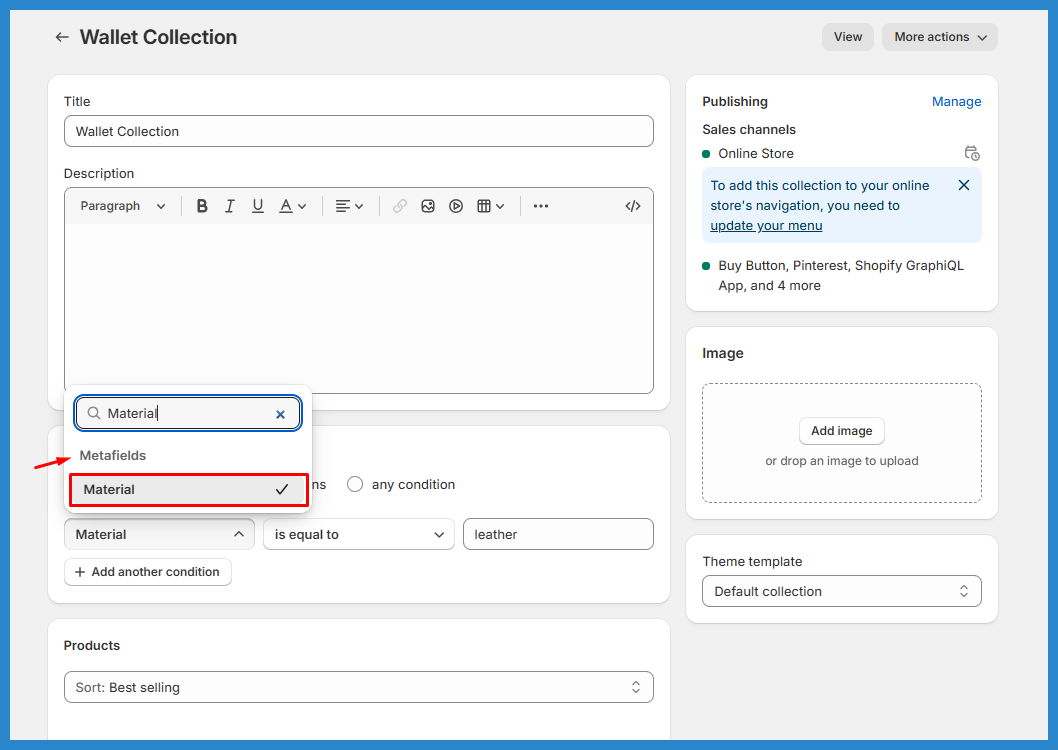
✅ From now on, this collection will automatically include all products that have “Leather” listed as the Material (from the Product Taxonomy).
3. Advantages of Smart Collections Based on Taxonomy
✅ Shopify automatically classifies products, eliminating the need for human labeling.
✅ Dynamic updates: New items that fit the requirements are added immediately.
✅ More organized data guarantees consistent product classification.
✅ Better filtering and SEO make it easier for customers to find things.
Custom metafields for product categories:
Shopify allows you to assign metafields to specific product categories, extending the standard attributes from Shopify’s Product Taxonomy. This helps tailor product data fields to match your store’s needs while keeping things structured and organized.
1. What Are Metafields Based on Categories?
Standard properties such as Material, Color, Pattern, Age Group, and so on are automatically assigned to various product categories by Shopify’s Product Taxonomy.
You can add your metafields that are exclusive to particular product categories by using custom metafields for product categories.
🔹 For instance:
Classification: “T-Shirts”
Default Features: Sleeve Length, Material, and Fit
Particular Metafields:
Custom.fabric_weight => Heavy, Medium, and Light, for example,
custom.print_technique → (Digital Print, Screen Print, etc.)
The “T-shirts” category is the only one for which these metafields will be visible.
2. How to Assign Particular Product Categories to Custom Metafields
First Step: Establish a Unique Metafield Definition.
- In Shopify Admin, select Settings > Custom Data > Products.
- To add a definition or modify an existing one, click Add.
- Choose a name (for example, “Fabric Weight”).
- Select a Type (such as Metaobject reference, Integer, or single-line text).
- Expose this metafield to Storefront API” should be enabled if necessary.
- Click “Save.”
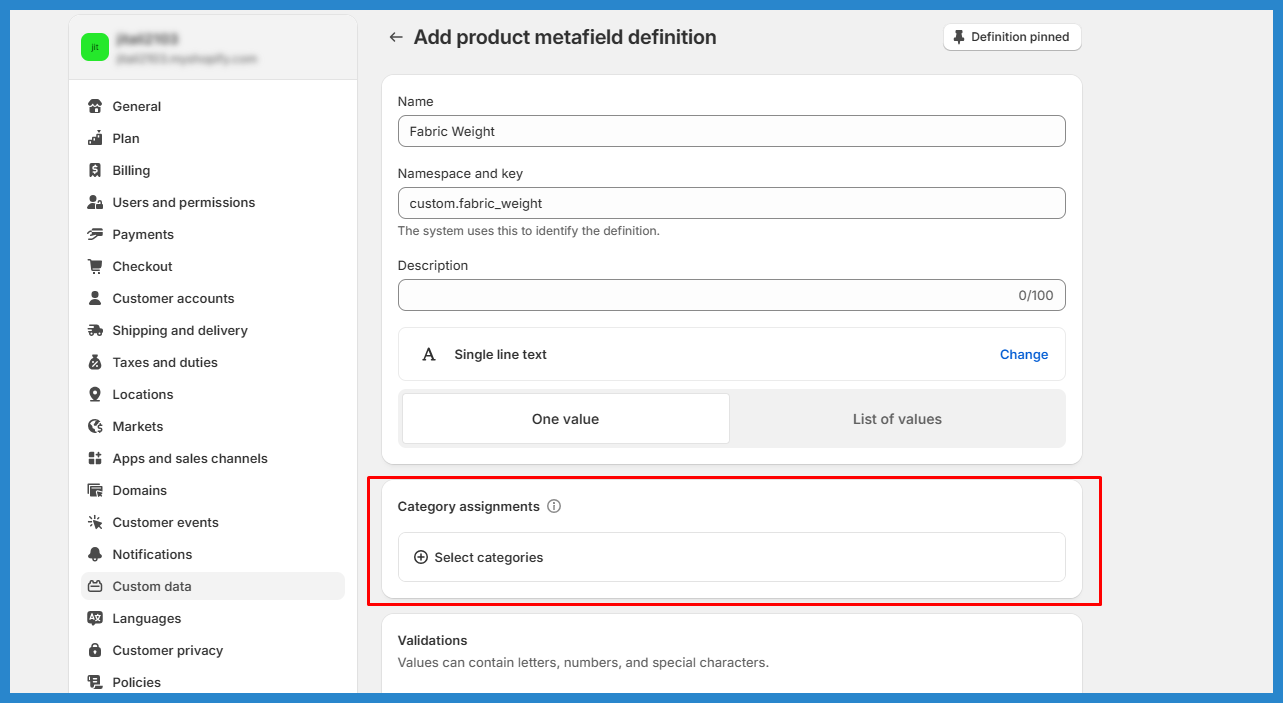
Second Step: Assign a Product Category to the Metafield.
- Go to “Applies to categories” in the metafield options.
- Select “Assign categories.”
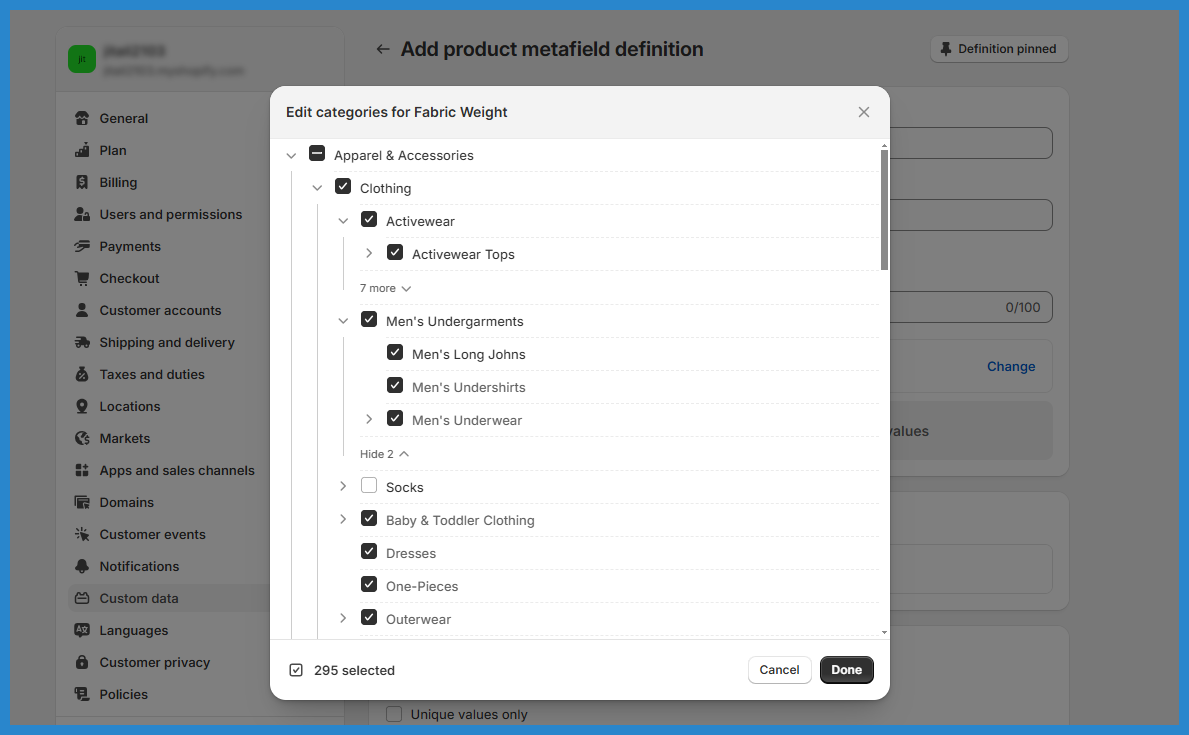
- Choose which product categories you would like to see this metafield in.
- For instance, jackets, hoodies, and t-shirts
- Preserve the metafield.
- The metafield will now show up in the Category Metafields section of the Product Detail Page in the Shopify Admin when you edit a product in these categories.
3. How to Utilize Storefront Category Metafields
After assigning metafields to categories, you can use Liquid to show them on your product pages:
{% if product.metafields.custom.fabric_weight %} |
✅ This metafield will now only be displayed for products in the designated category.
4. Advantages of Category-Based Metafield Utilization
✅ Clears up clutter: Only pertinent metafields for every product type are displayed.
✅ Improved organization: Product data is more meaningful and structured.
✅ Customers may filter products based on particular qualities, improving store search and filtering.
✅ Improved API integrations maintain data structure for apps developed by third parties.
For More info, click here.


