Welcome to CodeCrew Infotech


Shopify CLI For Theme Development
The best way to automate working with Shopify themes and set up a local development environment is to use the Shopify CLI (Command Line Interface). It was originally designed for creating Shopify apps, but it can now also be used to create and update themes.
How to Setup the Shopify CLI on Windows:
If you are trying to install this on Windows, you will need to install Ruby and DevKit first. Then you can install the RubyGems.
Next, open the Command Prompt (Terminal), and type the following command:
| gem install shopify-cli |
The installed version can be used to verify the installation:
| shopify version |
The "shopify help" command will provide all of the Shopify CLI's useful commands:
| shopify help |
To finish our setup, we'll need two more things: a theme for our Shopify store—the "Dawn" default theme will be used. You can open a partner account with Shopify and set up a development store if you do not already have one.
We will also require a base theme to get started, and the Shopify "Dawn" theme is currently the best option for 2.0 themes.
Connecting CLI with our Shopify store:
Our first step will be to log in to our store via CLI. So, enter the following command:
| shopify login --store=yourstorename.myshopify.com |
You will be required to log in to the store after this opens a new browser window with a login screen. The following response will be provided to you after that:
| Authenticated successfully. You may now close this page. |
Back to the Terminal. if we have more than one organization, we will have to choose which one. When we do, we will see we have successfully logged in to our store.

If you are updating many stores daily you may forget which store you have logged in to. You can enter the following command and you will get the same response as above.
| shopify whoami |
Downloading a Shopify theme to your local computer
Using the "pull" command, we will import our theme into a folder on our computer.
| shopify theme pull |
When we press ENTER, Shopify will ask us to choose a theme:

Enter after selecting the theme you want. This will get the records from our live store and introduce them onto our PC.
If everything ok, then you will get the following response:

Using Shopify CLI, create a local development environment:
A development theme will need to be created in order for us to be able to preview the code changes locally. That entails developing a hidden theme that runs locally while connected to our live Shopify store in this instance. Sounds confounding? When we set it up, it will be much easier to understand.
Enter the following command in the terminal:
| shopify theme serve |
With this command, our local theme and related Live Store will be in sync.
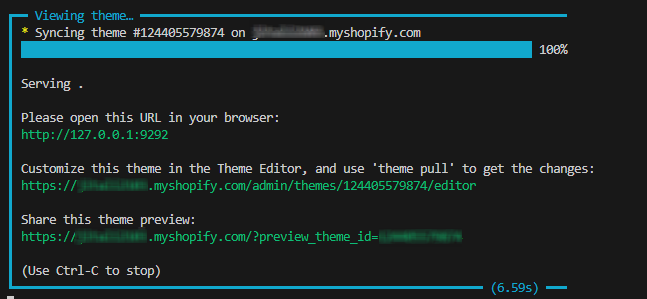
Now that we are using a local server, we can use the link we were given to view a preview of our theme in the browser.
One thing to keep in mind is that because this is a hidden theme, the changes we make in the Online Store Editor will not be saved. Because of this, we need to connect it to GitHub, a cool new Shopify feature. We must use the online editor from our Shopify admin rather than the one generated locally if we are making changes in the online editor.
You may also like